Hosting a Verdaccio NPM Registry on Hetzner Cloud Part 2: Adding a User and Securing the Server
In Part 1 we bought a server and added an SSH key to the root user. If you skipped that part because you already had a server, please make sure you also have your public SSH key added to the root user's authorized_keys file as this part of the guide will assume that's already set up.
Adding a User
As a rule of thumb you want to use the root user for as few things as possible, so let's go ahead and create a regular user account we can use instead. I'll name mine "pistachio". Make sure you give the user a strong password. You can skip all the other fields by just pressing Enter on all of them.
root@verdaccio:~# adduser pistachio
Adding user `pistachio' ...
Adding new group `pistachio' (1000) ...
Adding new user `pistachio' (1000) with group `pistachio' ...
Creating home directory `/home/pistachio' ...
Copying files from `/etc/skel' ...
New password:
Retype new password:
passwd: password updated successfully
Changing the user information for pistachio
Enter the new value, or press ENTER for the default
    Full Name []:
    Room Number []:
    Work Phone []:
    Home Phone []:
    Other []:
Is the information correct? [Y/n]
root@verdaccio:~#
Next thing we'll do is add the user to the sudo group
root@verdaccio:~# usermod -aG sudo pistachio
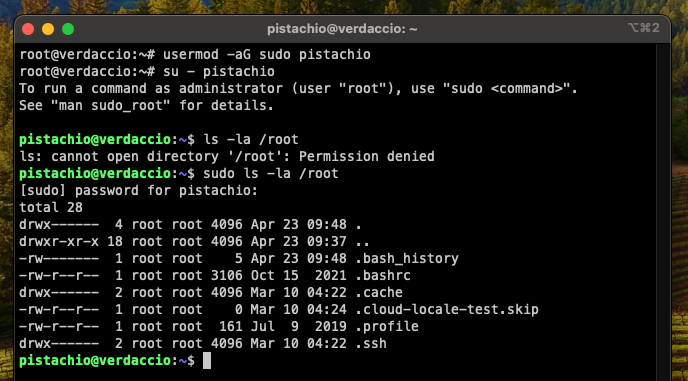
You can test sudo access by switching over to the new user, try to run a command that requires root privileges and then running again with sudo.
root@verdaccio:~# su - pistachio
pistachio@verdaccio:~$ ls -la /root
ls: cannot open directory '/root': Permission denied
pistachio@verdaccio:~$ sudo ls -la /root
[sudo] password for pistachio:
Enter the password you selected for your user. If everything works correctly the contents of the /root directory should now be printed to the screen, like .bashrc, .profile, etc
Something like this is what you should see
Run exit to go back to your root shell. One more thing we want to set up is ssh key login for the new user. We already have the info we need on the root user, so we can just copy that over and then make sure all owners and permissions are correct
root@verdaccio:~# cp -r ~/.ssh /home/pistachio
root@verdaccio:~# chown -R pistachio:pistachio /home/pistachio/.ssh
When that's done you can run exit again to log out of your ssh session.
Now let's try to ssh in as your new user ssh -i <path to private key> <username>@<IP-address>. With my example values that becomes
❯ ssh -i ~/.ssh/id_ed25519-hetzner-verdaccio pistachio@78.47.20.27
That should log you in with your ssh key, so without requiring the pistachio user password.
Firewall
Once you're in we're going to continue making our server more secure. Next step is to enable the Uncomplicated Firewall ufw.
pistachio@verdaccio:~$ sudo ufw allow OpenSSH
[sudo] password for pistachio:
Rules updated
Rules updated (v6)
pistachio@verdaccio:~$ sudo ufw enable
Command may disrupt existing ssh connections. Proceed with operation (y|n)? y
Firewall is active and enabled on system startup
pistachio@verdaccio:~$ sudo ufw status
Status: active

To                         Action      From
--                         ------      ----
OpenSSH                    ALLOW       Anywhere
OpenSSH (v6)               ALLOW       Anywhere (v6)
All connections, except SSH, are now blocked. When you install new applications you want to be able to connect to you need to activate them in the firewall.
SSH Server (sshd) Configuration
To enhance the security of your server even more, we'll deactivate password based logins, and not allow the root user to login using ssh at all
Open the sshd config file using your preferred editor. I use vim
pistachio@verdaccio:~$ sudo vim /etc/ssh/sshd_config
Find the commented out line that says#PasswordAuthentication yes
and change it toPasswordAuthentication no
Also find#PermitRootLogin prohibit-password
and change that toPerminRootLogin no
:wq to write the file and quit vim
Restart the sshd service
pistachio@verdaccio:~$ sudo systemctl restart ssh
Conclusion
Any computer connected to the Internet is subject to attacks. Common attack vectors are poorly configured SSH servers and (default) users with weak passwords. In this part of the guide we locked down the server as much as we could by enabling the Uncomplicated Firewall (ufw), making sure no one can login in remotely using only a username plus password combination and we blocked root login even over SSH.
Next up, in Part 3, is to configure a reverse proxy with SSL certificates to have encrypted communication with the Verdaccio NPM registry. We'll be using the nginx reverse proxy and web server for this.
Cover Photo by Sammyayot254 on Unsplash