Hosting a Verdaccio NPM Registry on Hetzner Cloud Part 4: Verdaccio
With nginx configured (see Part 3) we're now ready for what we all came here to do – to install and set up Verdaccio!
NodeJS and fnm
Verdaccio is built using NodeJS, so we need to install node. I know I'll want to run other node based apps as well, and they might require a different version of node. So I'll install a node version manager first, and then use that to install node.
I'll be using Fast Node Manager fnm, which requires unzip to be available for its installation script to work
pistachio@verdaccio:~$ sudo apt install unzip
It's a pretty common practice on Linux to have specific users for specific apps/services. We'll be doing the same thing here, so let's create a separate user for Verdaccio.
pistachio@verdaccio:~$ sudo adduser --system --gecos "" --group verdaccio
This isn't a "normal" user that should be able to log in to the server, so we're creating a system user here. And we're skipping all the prompts for Full Name, Room Number etc by specifying --gecos "". Finally we're also creating a separate group for this user that we also name "verdaccio".
Let's switch over to the new user
pistachio@verdaccio:~$ sudo su -s /bin/bash verdaccio
Since verdaccio is a system user with no login switching is a little different in that we have to specify that we want to run the bash shell. Let's follow up by running cd to get to verdaccio's home directory.
Now we can install fnm by running its install script
verdaccio@verdaccio:~$ curl -fsSL https://fnm.vercel.app/install | bash
Notice that we're not using sudo here because we want to install this as the verdaccio user into directories that verdaccio (the user) has full access to.
Follow up by sourcing .bashrc to load fnm into our current shell (another option would be to log out and then log back in again)
verdaccio@verdaccio:~$ source /home/verdaccio/.bashrc
With fnm loaded we can now install node. I like using the latest LTS version, which is node 20 right now.
verdaccio@verdaccio:~$ fnm install 20
Verdaccio
Finally ready to install Verdaccio!
verdaccio@verdaccio:~$ npm install -g verdaccio
We install it globally, which just means that it's "global" to the verdaccio user, i.e. not tied to any particular nodejs project.
Make sure it's installed, and also print its installation directory
verdaccio@verdaccio:~$ npm ls -g --depth 0
/home/verdaccio/.local/share/fnm/node-versions/v20.12.2/installation/lib
├── corepack@0.25.2
├── npm@10.5.0
└── verdaccio@5.30.3
That's looking great! Let's run it 🙂
verdaccio@verdaccio:~$ verdaccio
 info --- config file  - /home/verdaccio/verdaccio/config.yaml
 info --- the "crypt" algorithm is deprecated consider switch to "bcrypt" in the configuration file. Read the documentation for additional details
 info --- using htpasswd file: /home/verdaccio/verdaccio/htpasswd
 info --- plugin successfully loaded: verdaccio-htpasswd
 info --- plugin successfully loaded: verdaccio-audit
 warn --- http address - http://localhost:4873/ - verdaccio/5.30.3
And now stop it again by pressing Ctrl+C. When we just now ran Verdaccio for the first time it created the directory /home/verdaccio/verdaccio. It contains Verdaccio's config file and a directory it'll use for storing packages it downloads or someone publishes to it. For now we want to focus on the config file. There are a few settings we want to tweak.
verdaccio@verdaccio:~$ vim verdaccio/config.yaml
As you might have seen when you ran Verdaccio it said something about switching to bcrypt. Do that by finding the commented out # algorithm: bcrypt line and removing the comment (#) from the start of that line. Also uncomment the rounds setting a couple of lines down. This is what you want that section of the config file to look like
# https://verdaccio.org/docs/configuration#authentication
auth:
  htpasswd:
    file: ./htpasswd
    # Maximum amount of users allowed to register, defaults to "+inf".
    # You can set this to -1 to disable registration.
    # max_users: 1000
    # Hash algorithm, possible options are: "bcrypt", "md5", "sha1", "crypt".
    algorithm: bcrypt # by default is crypt, but is recommended use bcrypt for new installations
    # Rounds number for "bcrypt", will be ignored for other algorithms.
    rounds: 10
Next up is logging. By default it just logs to stdout, but for our purposes it's better if it logs to a file
# https://verdaccio.org/docs/logger
# log settings
# log: { type: stdout, format: pretty, level: http }
log: { type: file, path: verdaccio/verdaccio.log, level: info }
Because we're running Verdaccio behind a reverse proxy we should configure trustProxy. If we don't configure it you won't see proper IP addresses in the Verdaccio logs, you'll only see the IP address the reverse proxy is forwarding all requests to (that was ::1 in my case).
server:
  keepAliveTimeout: 60
  # Allow `req.ip` to resolve properly when Verdaccio is behind a proxy or load-balancer
  # See: https://expressjs.com/en/guide/behind-proxies.html
  trustProxy: true
We're going to publish a test package later. To avoid trying to also publish to the upstream npmjs.org registry we're disabling proxying for packages in our own scope (I chose @tobbe.dev as my scope name, you're of course free to choose whatever you like)
packages:
  '@tobbe.dev/*':
    # our own scoped packages
    access: $all
    publish: $authenticated
    unpublish: $authenticated
(Without this config all scoped packages would use the '@*/*' rules, which includes proxy: npmjs which would also proxy any publish requests to the main npmjs.org registry.)
nginx
Now that Verdaccio is installed it's time to go back to configuring nginx again. nginx keeps all the config for the different (sub-)domains it serves in /etc/nginx/sites-available/ so let's go there (exit out of the verdaccio user shell if you're still in there first, so you get back to pistachio, exit)
pistachio@verdaccio:~$ cd /etc/nginx/sites-available/
Make a copy of default and call it pistachio.tobbe.dev for the subdomain we'll be using for Verdaccio. And then open it up in your editor of choice (vim, of course! 😄)
pistachio@verdaccio:/etc/nginx/sites-available$ sudo cp default pistachio.tobbe.dev
pistachio@verdaccio:/etc/nginx/sites-available$ sudo vim pistachio.tobbe.dev
Get rid of most of the comments and make sure everything is nicely formated so it's easy to read. This is what you want it to look like.
server {
    server_name pistachio.tobbe.dev; # managed by Certbot

    listen [::]:443 ssl ipv6only=on; # managed by Certbot
    listen 443 ssl; # managed by Certbot

    location / {
        proxy_pass http://localhost:4873/;
        proxy_set_header X-Real-IP $remote_addr;
        proxy_set_header X-Forwarded-For $proxy_add_x_forwarded_for;
        proxy_set_header X-Forwarded-Proto $scheme;
        proxy_set_header Host $host;
        proxy_set_header X-NginX-Proxy true;
    }

    ssl_certificate /etc/letsencrypt/live/pistachio.tobbe.dev/fullchain.pem; # managed by Certbot
    ssl_certificate_key /etc/letsencrypt/live/pistachio.tobbe.dev/privkey.pem; # managed by Certbot
    include /etc/letsencrypt/options-ssl-nginx.conf; # managed by Certbot
    ssl_dhparam /etc/letsencrypt/ssl-dhparams.pem; # managed by Certbot
}

server {
    server_name pistachio.tobbe.dev;

    listen 80;
    listen [::]:80;

    if ($host = pistachio.tobbe.dev) {
        return 301 https://$host$request_uri;
    } # managed by Certbot

    return 404; # managed by Certbot
}
To activate this configuration we put a symlink to it in /etc/nginx/sites-enabled
pistachio@verdaccio:/etc/nginx/sites-available$ sudo ln -s /etc/nginx/sites-available/pistachio.tobbe.dev ../sites-enabled/pistachio.tobbe.dev
Now that we've moved the verdaccio server config to its own file, we should clean up the default config
pistachio@verdaccio:/etc/nginx/sites-available$ sudo vim default
server {
    listen 80 default_server;
    listen [::]:80 default_server;
    server_name _;
    return 410;
}
That config will make nginx reply with HTTP status 410 (GONE) for all sub domains that are not configured
Verify that your config is sound
pistachio@verdaccio:~$ sudo nginx -t
nginx: the configuration file /etc/nginx/nginx.conf syntax is ok
nginx: configuration file /etc/nginx/nginx.conf test is successful
Reload the nginx unit
pistachio@verdaccio:~$ sudo systemctl reload nginx
Time to log back into the verdaccio user account
pistachio@verdaccio:~$ sudo su -s /bin/bash verdaccio
verdaccio@verdaccio:/home/pistachio$ cd
Run Verdaccio temporarily in the foreground, just to make sure everything is working
verdaccio@verdaccio:~$ verdaccio
Open another terminal, SSH to your vps and look at the verdaccio logs to see that it started, and to be able to troubleshoot any problems
pistachio@verdaccio:~$ sudo tail -f /home/verdaccio/verdaccio/verdaccio.log
[sudo] password for pistachio:
 info --- config file  - /home/verdaccio/verdaccio/config.yaml
 info --- using htpasswd file: /home/verdaccio/verdaccio/htpasswd
 info --- plugin successfully loaded: verdaccio-htpasswd
 info --- plugin successfully loaded: verdaccio-audit
 warn --- http address - http://127.0.0.1:4873/ - verdaccio/5.30.3
Now try to access Verdaccio in your browser by going to your configured (sub-)domain. For me that's https://pistachio.tobbe.dev
You should see something like this:
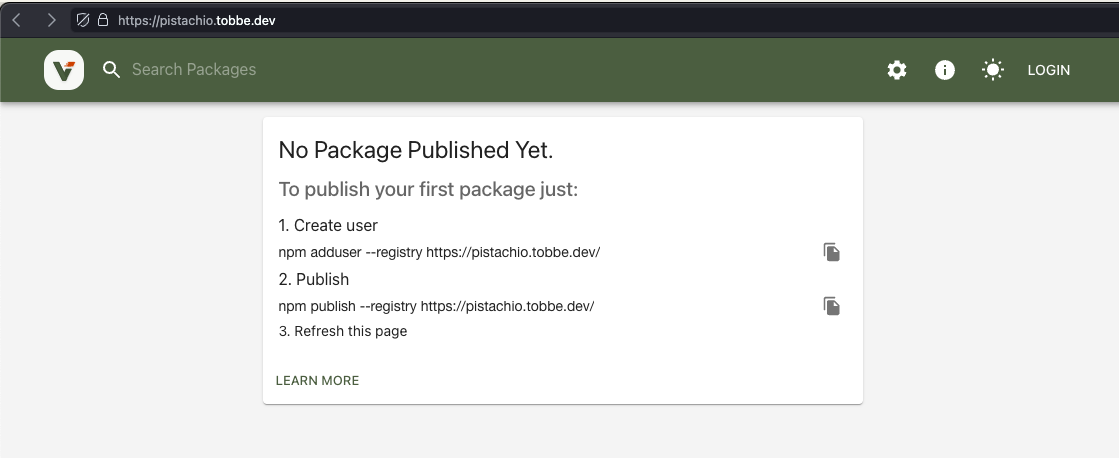
Go ahead and follow the instructions:
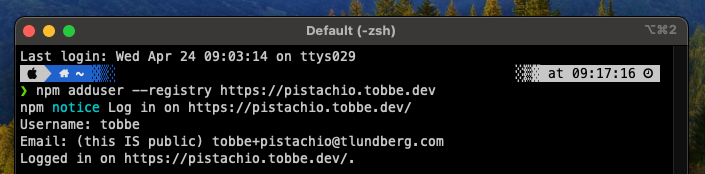
On your local computer, in your terminal, run the following command (but substituting your own URL, of course)
❯ npm adduser --registry https://pistachio.tobbe.dev
Going back to the terminal where you're tailing your verdaccio logs you should now see
 info <-- 217.201.48.96 requested 'POST /-/v1/login'
 info <-- 217.201.48.96 requested 'PUT /-/user/org.couchdb.user:tobbe'
 info --- the user tobbe has been added
Now let's try publishing a package!
On your local computer
❯ mkdir -p ~/tmp/v-test
❯ cd ~/tmp/v-test
❯ npm init -y
Add a bin to package.json and update some values. The most important value to update is the name, to make sure it also includes our scope. Otherwise publishing will fail.
❯ vim package.json
{
  "name": "@tobbe.dev/v-test",
  "version": "1.0.0",
  "description": "Saying Hello World! from a Verdaccio package",
  "main": "index.js",
  "bin": {
    "v-test": "index.js"
  },
  "scripts": {
    "test": "echo \"Error: no test specified\" && exit 1"
  },
  "keywords": [],
  "author": "Tobbe Lundberg",
  "license": "ISC"
}
Add an index.js file
❯ vim index.js
#!/usr/bin/env node

console.log("Hello World!");
Now we're ready to publish our test package
❯ npm publish --registry https://pistachio.tobbe.dev/
Hopefully that goes well. If not – check your logs (both nginx and verdaccio) – to try to figure out what went wrong
Let's make sure it's in Verdaccio's storage. tree is a very useful Unix tool to visualize directory structures. So I recommend installing that first. This is what it looks like for me after a successful publish.
pistachio@verdaccio:~$ sudo apt install tree
pistachio@verdaccio:~$ sudo tree /home/verdaccio/verdaccio/storage
/home/verdaccio/verdaccio/storage
└── @tobbe.dev
    └── v-test
        ├── package.json
        └── v-test-1.0.0.tgz

2 directories, 2 files
Now that we know it's all working there's another tool we should configure – systemd – to make sure Verdaccio starts on server start and restarts if it ever crashes.
systemd
Verdaccio comes with a basic systemd unit file. We just need to copy it to a place where systemd will read it
pistachio@verdaccio:~$ sudo cp /home/verdaccio/.local/share/fnm/node-versions/v20.12.2/installation/lib/node_modules/verdaccio/systemd/verdaccio.service /etc/systemd/system/
You might be asking how I figured out that long path. And that's a good question! 🙂 You can run which verdaccio as the verdaccio user and you'll get something like /home/verdaccio/.local/state/fnm_multishells/27702_1713942027155/bin/verdaccio back. But because of how fnm works that's just a symlink and it's not guaranteed to always be available. To figure out where it really is we can combine that with realpath. So the final command is realpath `which verdaccio` and that'll give you /home/verdaccio/.local/share/fnm/node-versions/v20.12.2/installation/lib/node_modules/verdaccio/bin/verdaccio. So that's the full path to the bin. Removing the last two parts of that path gives us the base directory for Verdaccio. And then we can just add on systemd/verdaccio.service to get the full path to the systemd unit file 😅
Now I like to make some modifications to the default unit
pistachio@verdaccio:~$ sudo vim /etc/systemd/system/verdaccio.service
[Unit]
Description=Verdaccio lightweight npm proxy registry
After=network-online.target

[Service]
Type=simple
Restart=on-failure
RestartSec=5
User=verdaccio
WorkingDirectory=/home/verdaccio
ExecStart=/home/verdaccio/.local/share/fnm/node-versions/v20.12.2/installation/bin/node /home/verdaccio/.local/share/fnm/node-versions/v20.12.2/installation/lib/node_modules/verdaccio/bin/verdaccio

[Install]
WantedBy=multi-user.target
I added the After=... option, because we need network to be online before we can start Verdaccio. I also added RestartSec=5 to give the system a few seconds to recover if something goes wrong (like if something crashed). WorkingDirectory=/home/verdaccio is also new, and finally I changed ExecStart to run node and pass it the main entry point for Verdaccio. To figure out the node path I used realpath `which node` (just as I showed for verdaccio earlier in this guide). Just remember to run it as the verdaccio user.
To make sure the systemd unit is working make sure you don't have Verdaccio running anywhere. Close or at least log out of all terminals that are connected to your VPS except for one, where you're logged in as the normal user (pistachio in my case). Then reload systemd to read all new units and finally enable the Verdaccio one
pistachio@verdaccio:~$ sudo systemctl daemon-reload
pistachio@verdaccio:~$ sudo systemctl enable --now verdaccio
After running that you should once again be able to access the Verdaccio web interface at your configured (sub-)domain. And now you should see your published package there!

Final test
To really make sure everything is working properly we're going to do two things:
Reboot the server
Make sure you can
npm installthe newly created package without manually touching anything on the server
Let's get to it!
pistachio@verdaccio:~$ sudo reboot
Wait a couple of minutes while the server reboots, and then try accessing the Verdaccio web interface. When that's up you will be able to also install the package you published.
❯ npm i -g --registry https://pistachio.tobbe.dev @tobbe.dev/v-test

added 1 package in 451ms
And now try to run it:
❯ v-test
Hello World!
It works! 🎉 Now go celebrate 🎉 🥳 🪅
When you're back it's time to clean up (the boring work you have to do after any party 🙁) because you probably don't want that test package to be cluttering up your system, right? At least I didn't!
❯ cd ~/tmp/v-test
❯ npm uninstall -g @tobbe.dev/v-test
❯ npm unpublish --force --registry https://pistachio.tobbe.dev
npm WARN using --force Recommended protections disabled.
- @tobbe.dev/v-test@1.0.0
❯ cd
❯ rm -fr ~/tmp/v-test
Conclusion
Lot's of things going on in this part of the guide! We started with installing Node by using fnm. Then we installed and configured Verdaccio. After that we went back to nginx and did some major changes to its config to support our own (sub-)domain. To make Verdaccio more resilient to crashes and have it running automatically after server reboots we added a systemd unit for it. Finally we tested it all out by publishing a package, rebooting the server and then installing the package we had published.
You now have Verdaccio configured and running on a Hetzner Cloud server. Congratulations! What you want to do from here on is up to you 🙂 In the next (and final, for now at least) part of this guide I'll show you some things I needed to do for what I wanted to use this for.