WebSockets in RedwoodJS
For realtime sync between clients

Realtime/WebSocket support in Redwood has been requested since forever*. For most people, using something like https://pusher.com/channels or https://supabase.com/docs/guides/realtime is the best choice. But I wanted to see if I could roll my own. (*beginning of 2020 😄)
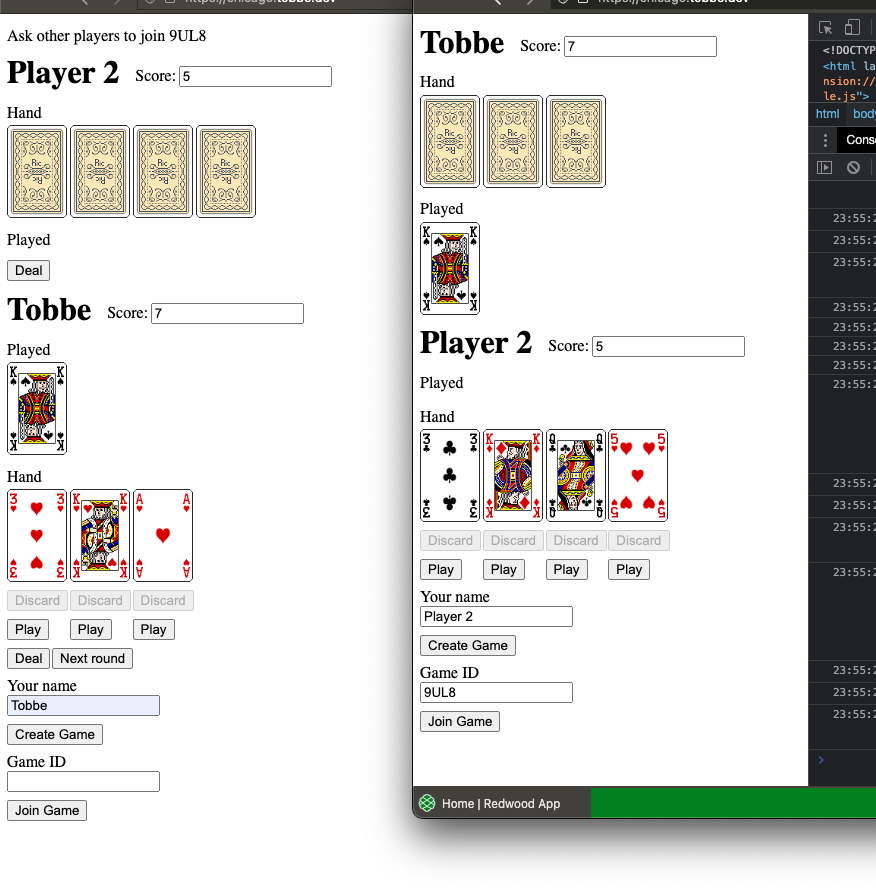
I decided to build a simple multiplayer card game that would use WebSockets to sync the game state for all players (what cards they have on hand, what cards they've played etc). That's what you can see in the screenshot at the top of the page.
EDIT 2023-02-27: A lot of the setup shown in this blog post can now be done for you by just running yarn dlx rw-setup-ws. Read more here https://community.redwoodjs.com/t/experiment-websockets-with-redwoodjs/4648
This blog post will show you how I set it up. But to keep it simple I'll just focus on a tiny part of the game: the score. If you look at the screenshot above you can see a score next to each player's name. I kept it super basic by just syncing all of the text inputs. You can just write whatever number you want in any of them and it'll sync to all players. We'll build something similar. An input field for a player's name and another one for the player's score. When the score is updated it'll be synced to all other players. But in this version, unlike in my actual game, you can only change your own score. (Not strictly true, but I'll let you figure that out as you play around with the code 😉)
Create a new Redwood project yarn create redwood-app --ts --git rw-ws-score
Redwood uses Fastify for its API side web server. To get it to understand WebSockets we need to install a plugin: yarn workspace api add @fastify/websocket
That's all we have to do as far as setup goes. Now let's write some code! This is where it really shows that Redwood wasn't designed for realtime or WebSocket support – we'll be writing all of the ws code on the api side in what is basically just meant to be a configuration file. But if you want ws support let us (the RW core team) know, and if there's enough demand we'll try to make the experience better!
Open up api/server.config.js and register the ws plugin.
const configureFastify = async (fastify, options) => {
  if (options.side === 'api') {
    fastify.log.info({ custom: { options } }, 'Configuring api side')

    fastify.register(require('@fastify/websocket'))
  }

  // ...
}
This lets Fastify know about WebSockets. Now we need to add a route that'll handle the ws traffic.
const configureFastify = async (fastify, options) => {
  if (options.side === 'api') {
    fastify.log.info({ custom: { options } }, 'Configuring api side')

    fastify.register(require('@fastify/websocket'))

    fastify.register((fastify) => {
      fastify.get('/ws', { websocket: true }, (connection) => {
        connection.socket.on('message', (message) => {
          console.log(`/ws message: ${message}`)
        })

        connection.socket.on('close', () => {
          console.log('Client disconnected')
        })
      })
    })
  }

  // ...
}
Let's test our code! Run yarn rw dev api in a terminal to start just the api side. In another terminal you can run npx -y wscat -c ws://localhost:8911/ws. It should open a connection to your server and give you a prompt. Type something, like hello world, and you should see it printed in the terminal that's running the RW api server.
Do you see the messages you type echoed in the api server terminal? If you do: Congratulations! You have a WebSocket web server running! If you don't: Try adding some console.logs, then restart the api server and try again. If you still can't get it to work, create a post on the RW forums and ping me there. We'll all do our best to help you.
Now that you've confirmed that the api side is working, let's add some code to the web side too. I'll over-engineer this a little bit for our simple example, just to give you a better foundation to stand on when you build this out with more functionality.
I'll put the websocket code in a React Context so that you can access it from anywhere in your app.
// web/components/WsContext/WsContext.tsx

import { useCallback, useContext, useEffect, useRef, useState } from 'react'

interface WsContextProps {
  players: Record<string, string>
  setScore: (playerId: string, score: string) => void
}

const WsContext = React.createContext<WsContextProps | undefined>(undefined)

interface Props {
  children: React.ReactNode
}

const WsContextProvider: React.FC<Props> = ({ children }) => {
  const [players, setPlayers] = useState<Record<string, string>>({})

  const ws = useRef<WebSocket>()

  useEffect(() => {
    const socket = new WebSocket('ws://localhost:8911/ws')

    socket.onopen = (event) => {
      console.log('socket open', event)
    }
    socket.onclose = (event) => {
      console.log('socket close', event)
    }
    socket.onerror = (event) => {
      console.log('socket error', event)
    }
    socket.onmessage = (event) => {
      console.log('socket message', event.data)

      try {
        const players = JSON.parse(event.data)
        setPlayers(players)
      } catch (e) {
        console.error('JSON.parse error', e)
      }
    }

    ws.current = socket

    return () => {
      socket.close()
    }
  }, [])

  const setScore = useCallback((playerId: string, score: string) => {
    ws.current?.send(JSON.stringify({ playerId, score }))
  }, [])

  return (
    <WsContext.Provider value={{ players, setScore }}>
      {children}
    </WsContext.Provider>
  )
}

export function useWsContext() {
  const context = useContext(WsContext)

  if (!context) {
    throw new Error(
      'useWsContext must be used within a WsContextProvider'
    )
  }

  return context
}

export default WsContextProvider
Basically what's going on here is I create a React Context with a useEffect that will only be called after the very first render thanks to its empty dependency array. The useEffect function sets up a new WebSocket connection to our api server, registers a bunch of callbacks and returns a clean-up function that will close the web socket connection when the context unmounts. Notice that we use the ws protocol when we specify the server address. The main socket callback is socket.onmessage which will receive all the messages from the WebSocket server. The other callbacks are mainly there to show you what's available and to help you debug any errors you might run into. On the context you can access all players and their scores plus a method to update the score for a player. It might look weird to have the score be a string instead of number, but that's just to make it easier to handle the score input later on. It makes it easier to handle empty input fields. WebSockets can only communicate using text, that's why we use JSON.stringify before sending an updated score for a player. Finally, there's a custom React hook to make it more convenient to use the context.
To make this context available to the entire app I place it in App.tsx
const App = () => (
  <FatalErrorBoundary page={FatalErrorPage}>
    <RedwoodProvider titleTemplate="%PageTitle | %AppTitle">
      <RedwoodApolloProvider>
        <WsContextProvider>
          <Routes />
        </WsContextProvider>
      </RedwoodApolloProvider>
    </RedwoodProvider>
  </FatalErrorBoundary>
)
The final piece of the web-side puzzle is to actually use the context. Let's create a page for this.
yarn rw g page home /
Here's the base component code
import { useState } from 'react'

import { useWsContext } from 'src/components/WsContext/WsContext'

const HomePage = () => {
  const [name, setName] = useState('')
  const [score, setScore] = useState('')
  const ws = useWsContext()

  return (
    <>
      <label>
        Name:{' '}
        <input
          value={name}
          onChange={(event) => {
            setName(event.target.value)
          }}
        />
      </label>
      <br />
      <br />
      <label>
        Score:{' '}
        <input
          value={score}
          onChange={(event) => {
            const score = event.target.value

            // Set the score in component state to make the input
            // value update immediately
            setScore(score)

            // Send to the server to update all clients (including
            // this one)
            ws.setScore(name, score)
          }}
        />
      </label>
      <hr />
      <ul>
        {Object.entries(ws.players).map(([playerId, playerScore]) => (
          <li key={playerId}>
            {playerId}: {playerScore}
          </li>
        ))}
      </ul>
    </>
  )
}

export default HomePage
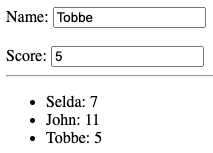
Unless you're super new to React the code should be pretty straightforward. A couple of input fields with state bound to them and then the context we created earlier is used to get a list of players to map over to display their names/ids and scores. The one thing that might look a little unusual is how we both keep our own score in the local score state as well as send it to the web socket using ws.setScore. But I hope the code comments are clear enough in describing what's going on and why I do it like that. With this code in place, we can start the RW dev server again, but this time we start both sides yarn rw dev. Enter your name and a score and you should see something like /ws message: {"playerId":"Tobbe","score":"5"} in your dev server terminal output.
Now it's time to focus on the API side code again. It needs to keep track of all players and their scores and broadcast it to everyone. So I add two global variables to the Fastify server config file: players for all the players and their scores, and wsConnections to keep track of all connections I should broadcast the new scores on. Both those variables are used in the socket.on('message' handler function. The code for that function now looks like this
console.log(`/ws message: ${message}`)

try {
  const player = JSON.parse(message)
  wsConnections[player.playerId] = connection
  players[player.playerId] = player.score

  Object.values(wsConnections).forEach((wsConnection) => {
    wsConnection.socket.send(JSON.stringify(players))
  })
} catch (e) {
  console.error('Could not parse input', message)
  console.error('error object:', e)
}
Start the dev server again if it isn't still running and go to http://localhost:8910 in two different browser windows. Enter a name and a score in both of them and notice that the score immediately is synced between both windows 🎉
There are a few things I've left as an exercise for the reader 😁
If you update your name you're seen as a new player and your old name with your old score is still kept around. See if you can make that work a little better
You're allowed to enter text in the score input fields. Should probably only be allowed to enter actual numbers (except for the empty string (''), which you might still want to allow)
Maybe you don't want to include yourself in the list of players with their scores. So maybe filter out your own player id.
Make it so you can't "steal" someone else's name.
This should work pretty well running on your computer using the dev server. If you want to deploy it there are a few more hoops you have to jump through. I'll write another blog post about that.
The full code for the example can be found here https://github.com/Tobbe/rw-ws-score/
Thanks for reading and don't hesitate to reach out if you have any questions.